The single decision that most often derails a custom polo order is not the fabric or the color. It is logo placement and size. A logo that sits an inch too high, runs too wide for the embroidery field, or floats without a fixed reference point produces sample after sample that never quite looks right. Specifying placement in plain measurements before production starts removes that back-and-forth entirely. Here is how to write that spec.
Start with the left chest, because it is the default
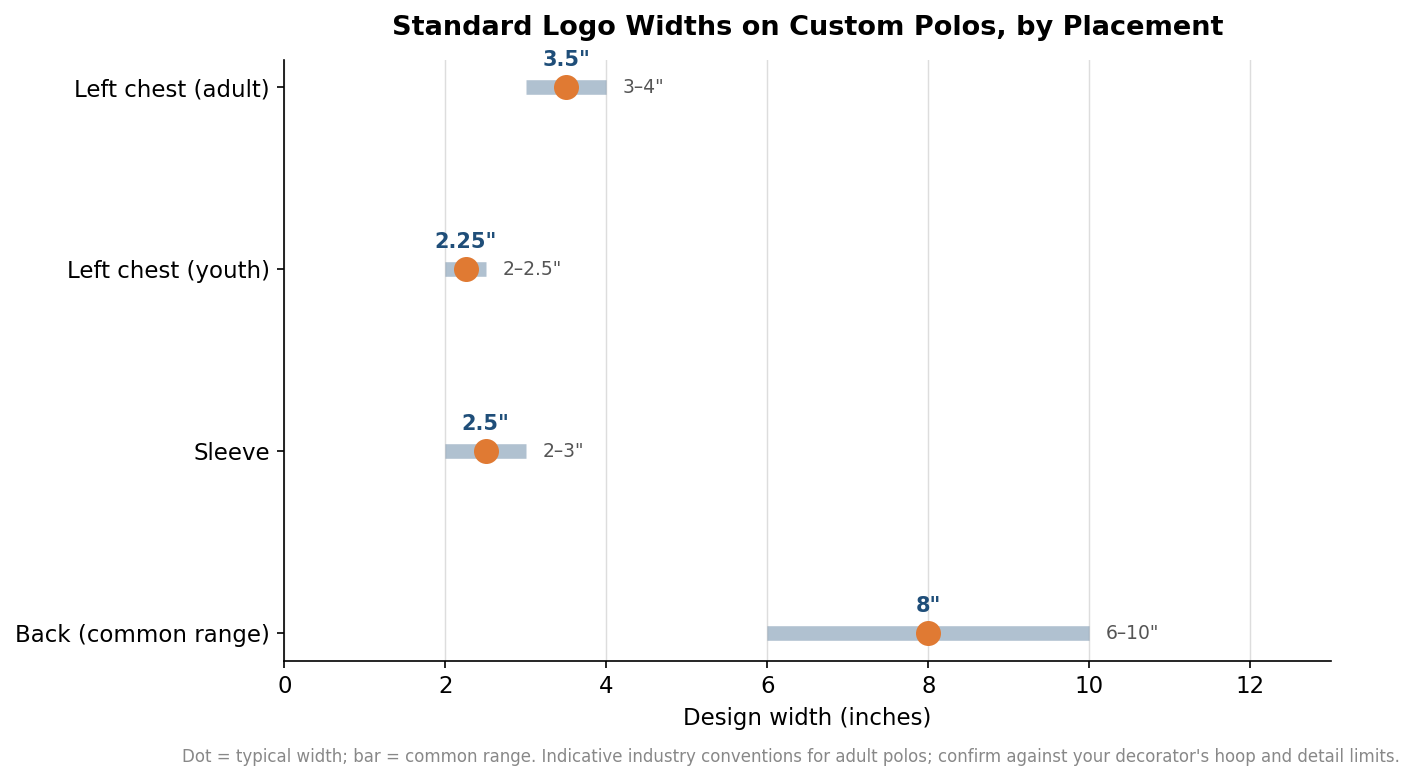
The left chest is where buyers expect a company or team mark, and it is the placement most decorators optimize their equipment around. For an adult polo, a left-chest logo is typically 3 to 4 inches wide, positioned 7 to 9 inches down from the shoulder seam and 4 to 6 inches in from the vertical center line. A 3.5-inch design landing about 7.5 inches below the shoulder seam is a safe, conventional choice that reads cleanly on most chest sizes.
Youth garments scale down. A left-chest mark on a youth polo usually runs 2 to 2.5 inches wide, and the vertical drop shrinks with the smaller torso. If you are ordering a mixed adult-and-youth run for a school or a family event, specify the two sizes separately rather than letting the shop guess a single compromise that fits neither well.
Sleeve, back, and secondary locations
A sleeve logo is a small mark, generally 2 to 3 inches wide, sitting a couple of inches up from the hem of a short sleeve so it does not disappear into the cuff. Circular sleeve designs hold up to about 3 inches in diameter; a horizontal layout can stretch to roughly 3.75 inches before it starts wrapping toward the seam.
Back designs cover the widest range. A full-width back print or embroidery runs anywhere from 5 to 12 inches, with 6 to 10 inches being the common working range, placed about 4 to 6 inches below the neckline. A small mark at the nape of the neck, just below the collar seam, is a subtler alternative that many uniform programs prefer over a large back hit. Decide early how many locations you are decorating, because each added location changes both your art requirements and your unit cost.
Embroidery and print do not follow the same rules
The decoration method sets hard limits on what a placement can hold. Embroidery renders detail in thread, so most shops cap a clean left-chest design at about 4 inches wide to keep small elements legible. A standard left-chest logo lands somewhere around 6,000 to 8,000 stitches; a dense or text-heavy mark climbs higher, and a large back can exceed 50,000. Because embroidery requires converting your artwork into a stitch file, expect a one-time digitizing charge in the range of $35 to $75, billed once per design rather than per shirt.
Fine lettering is where embroidery buyers get surprised. As a rule of thumb, letters below roughly a quarter inch (about 5 mm) tall start to lose legibility in thread, because there is a floor on how small a satin stitch can be and still hold its shape. That figure is indicative rather than exact, and it varies with typeface weight and thread, but if your tagline is disappearing at size, simplify it or move it to a print method. Screen printing and heat-applied transfers hold fine detail and gradients that embroidery cannot, which is why the same logo is sometimes embroidered on a polo and printed on a matching tee.
Let the garment and its color steer the final call
Placement math assumes a flat, predictable panel, and real polos vary. A three-button placket, a knit collar, and a chest pocket all compete for the same real estate, so on a busy front you may shift the left-chest mark slightly to clear the placket stitching. Women’s and tall cuts move the shoulder-seam reference point, which is why measuring from a fixed landmark matters more than eyeballing “center chest.”
Color drives the other half of the decision. Popular blank models sold for customization span a wide tonal range: the Port Authority K540 runs from XS to 6XL in roughly 18 stock colors, the moisture-wicking Nike Dri-FIT NKDC1963 offers around 20, and the Cutter & Buck and Sport-Tek performance polos add still more. On a dark garment your thread or ink has to carry contrast, which sometimes means adding a thin outline or a light underlay to a logo that was designed for white. Approve the mark on the actual garment color you are ordering, not on a white mockup.
What belongs on the spec sheet
A production-ready placement spec has four parts. First, name the location in plain terms: left chest, right sleeve, center back. Second, give the finished design width in inches. Third, give the position as measurements from a fixed point, such as “top of logo 7.5 inches below the shoulder seam, centered 4.5 inches from the placket.” Fourth, supply artwork in a vector format so the shop can scale it without the edges going soft, and for embroidery, confirm who owns the digitized file after setup.
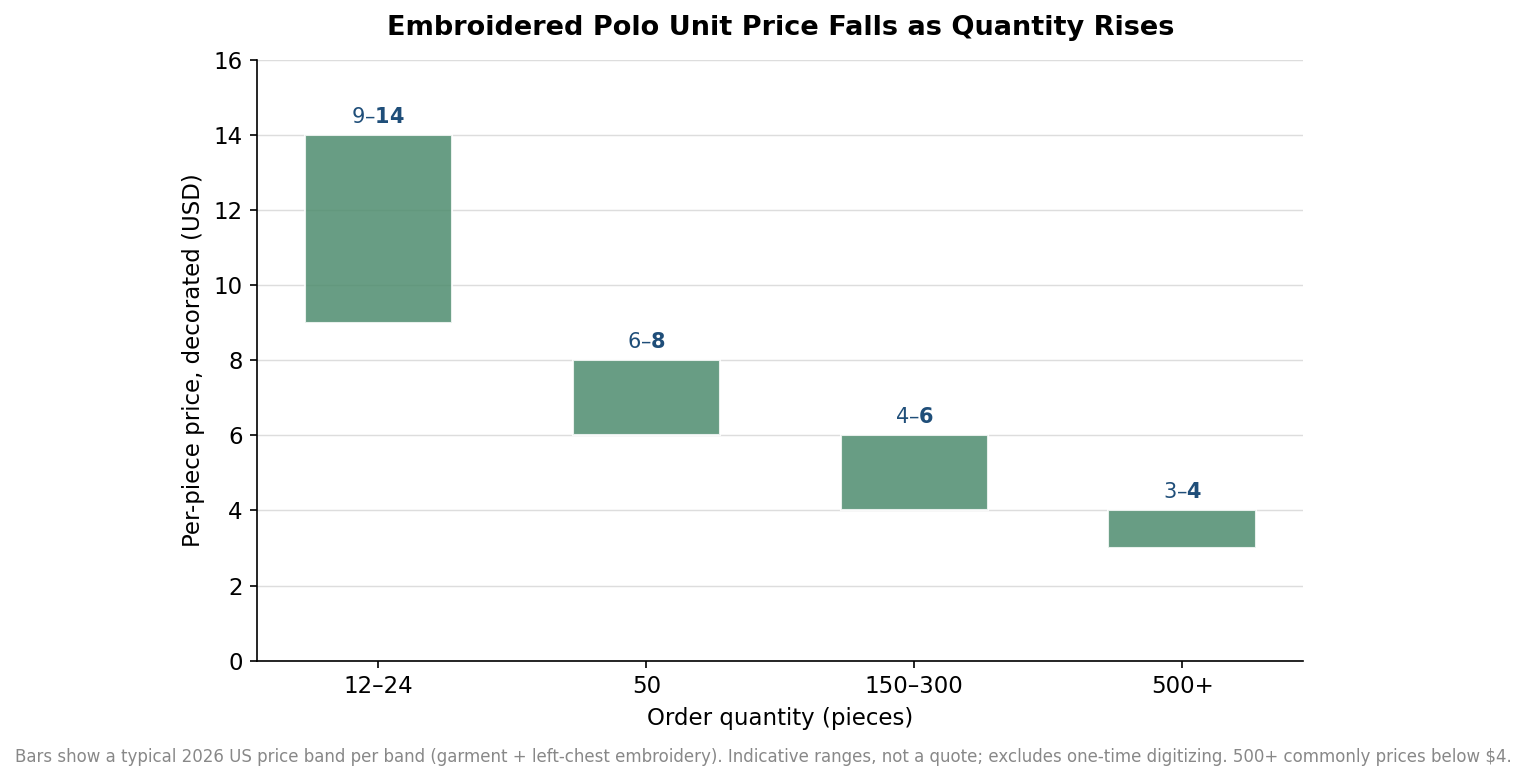
Then ask for a proof before the full run. For print, that is a digital or physical mockup on the correct color; for embroidery, a physical sew-out is the only reliable way to see how small text and fine registration actually stitch on that fabric. The cost of one sew-out is trivial against a box of shirts with a logo placed an inch off. Unit economics reward that patience too: decorated polos commonly run $9 to $14 each at 12 to 24 pieces and fall toward $4 to $6 in the 150 to 300 range, so the volume you commit to is itself part of the spec. Get the placement right once, save the approved file, and every reorder becomes a repeat rather than a fresh negotiation.
Leave a Reply